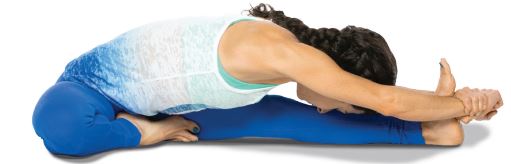
The garland pose stretches the ankles, groins, and back. If your heels don’t reach the floor, rest them on a folded blanket.

BY YJ EDITORS
Garland Pose: Step-by-Step Instructions
Step 1
Squat with your feet as close together as possible. (Keep your heels on the floor if you can; otherwise, support them on a folded mat.)
Step 2
Separate your thighs slightly wider than your torso. Exhaling, lean your torso forward and fit it snugly between your thighs.
Step 3
Press your elbows against your inner knees, bringing your palms to together in Anjali Mudra (Salutation Seal), and resist the knees into the elbows. This will help lengthen your front torso.
Step 4
To go further, press your inner thighs against the sides of your torso. Reach your arms forward, then swing them out to the sides and notch your shins into your armpits. Press your finger tips to the floor, or reach around the outside of your ankles and clasp your back heels.
Step 5
Hold the position for 30 seconds to 1 minute, then inhale, straighten the knees, and stand into Uttanasana.
Pose Information
Sanskrit Name
Malasana
Pose Level
1
Contraindications and Cautions
Low back or knee injuries
Beginner’s Tip
If squatting is difficult, sit on the front edge of a chair seat, thighs forming a right angle to your torso, heels on the floor slightly ahead of your knees. Lean your torso forward between the thighs.
Benefits
- Stretches the ankles, groins and back torso
- Tones the belly
This article was first published in the print edition of Yoga Journal Singapore, which is now Yogahood Online.