Heron Pose is an intense hamstring stretch. You may need to give Krounchasana some time.

Heron Pose: Step-by-Step Instructions
Step 1
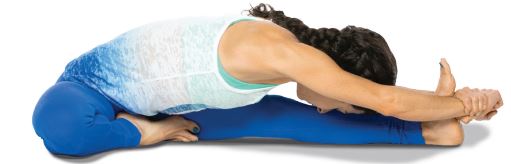
Sit in Dandasana (Staff Pose). Bring your left leg into Ardha Virasana. Then bend your right knee and place the foot on the floor, just in front of the right sitting bone. Place your right arm against the inside of the right leg (so that your shoulder presses against the inner knee). Cross your hand in front of the right ankle and grasp the outside of the right foot. Finally grasp the inside of the right foot with your left hand.
Step 2
Lean back slightly, but keep the front torso long. Firm the shoulder blades against your back to help maintain the lift of the chest. Inhale and raise the leg diagonally to the floor, angled about 45 degrees, or with the foot as high as or slightly higher than your head.
Step 3
Hold this position for 30 seconds to a minute. Then exhale and release the raised leg. Carefully unbend and straighten the left leg (see the description of Virasana [Hero Pose] for the safe way to remove the leg from its position). Repeat with the legs reversed for the same length of time.
Pose Information
Sanskrit Name
Krounchasana
Pose Level
1
Contraindications and Cautions
- Menstruation
- If you have any serious knee or ankle problems, avoid the Ardha Virasana (Half Hero Pose) leg position in this pose unless you have the assistance of an experienced instructor. Instead sit with the legs positioned in Janu Sirsasana (Head-to-Knee Forward Bend)
Modifications and Props
Many beginning students won’t be able to completely straighten the raised leg or will lose the lift of the chest when attempting to straighten the leg. To counter this, place a strap around the sole of the foot before you try to straighten the leg. Hold the strap as close to the foot as possible, but don’t sacrifice keeping the elbows fully extended and the chest lifted.
Deepen the Pose
Advanced students can increase the stretch on the back of the raised leg by bringing the leg and torso together. From the position described in step 2 above, bend your elbows sharply out to the sides, lean the torso slightly forward, and draw the leg in. Be sure to keep the front of the torso relatively long; don’t lean forward from the belly.
Theraputic Applications
- Flat feet
- Flatulence
Benefits
- Stretches the hamstrings
- Stimulates the abdominal organs and heart